

SQLMesh: The Next-Generation Open Source Data Transformation Tool
#3: Data Pipeline Summer Challenge- Including a hands-on project teaching you how to set up and use SQLMesh for data modeling
If you closely follow the analytics engineering community, then you've probably heard of the new kid on the block- SQLMesh. As a long-time user of traditional transformation tools, I was initially resistant to trying out something new. How could a next-generation tool possibly replace my existing workflow?
But this is also why I love trying out new tools. If a company has no competition, the tool usually takes a turn for the worse. Companies stop innovating. They raise their prices. You are stuck with something expensive that no longer gets the job done.
SQLMesh represents the next generation of open-source data transformation tool. They are open-source first, something that traditional tools have recently strayed away from, frustrating a lot of their core user base.
I thought, what better way for me to learn how to use SQLMesh and for you to also learn it by making it the transformation and orchestration tool of choice for Data Pipeline Summer!
In this article, we will discuss why SQLMesh was created as a next-generation solution, including use cases and code structure. I’ll also show you how to get started with SQLMesh and create a project of your own that we will use for the rest of Data Pipeline Summer challenge.
Why SQLMesh
SQLMesh is a data transformation framework with embedded documentation, modeling, and testing. It focuses on shipping models quickly, efficiently, and without error. It addresses a lot of things that legacy tools don’t, including:
reducing warehouse costs (due to how it executes model changes)
enabling blue-green deployment
debugging errors and addressing impact before running models
scheduling models from within the project
running Python models alongside your SQL models
It uses less YAML files, keeping documentation and model configs inside the SQL file where your model is written.
When to Use SQLMesh
Tobiko offers a commercial product with a robust cloud-based UI. You can think of it as the tool for your less-technical analytics engineers, data analysts, and business stakeholders. Legacy vendors are moving away from open source entirely, shifting to making their tools accessible for non-technical folks, which I’m not sure I’m on board with.
Open-source SQLMesh is ideal for the more technical analytics engineering or data engineering teams who need robust operational capabilities, comprehensive environment management, and the ability to handle complex workflows that aren't only SQL. It's great for teams with a lot of models where performance is top priority.
“SQLMesh tracks the state of each model and can automatically determine which models have been changed either directly or indirectly. Only impacted models are executed as part of the development environment while data from other models is safely reused from production. This is similar to traditional deferral features but without any user involvement or state management.”
Because of its use of virtual data environments, it’s able to maximize the runtime efficiency by only running the models impacted by changes. SQLMesh compares the local state of your project with your target environment (typically production). Plans allow you to see the impact of your changes and only run the resources that are impacted, therefore saving costs and increasing performance. This is HUGE for companies looking to save on compute resources.
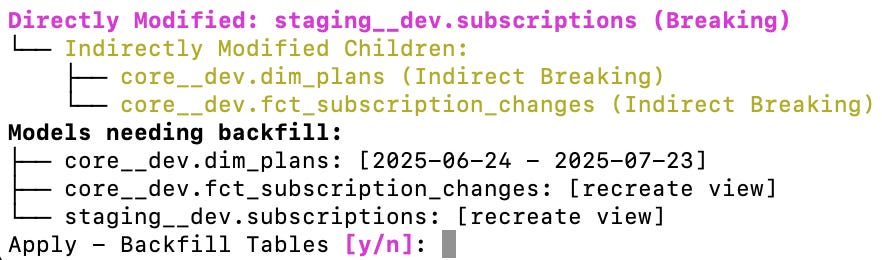
For example, if I make a change to one of my staging model columns, SQLMesh will alert me of the downstream models that will break because of this, BEFORE I run the model:
SQLMesh's Modern Syntax Approach
Materialization
Like I mentioned earlier, SQLMesh defines everything in the SQL file with the model. SQLMesh syntax uses SQL and defines a model as a view like so:
MODEL (
  name staging_plans,
  kind VIEW
);

SELECT
    plan_id,
    plan_name,
    plan_level,
    monthly_price*100 AS monthly_price_usd_cents,
    annual_price*100 AS annual_price_usd_cents,
    max_hikes_per_month,
    photo_storage_gb,
    description AS plan_description
FROM raw_plans
Compared with using Jinja and the name of the SQL file:
{{ config(materialized='table') }}

SELECT
    plan_id,
    plan_name,
    plan_level,
    monthly_price*100 AS monthly_price_usd_cents,
    annual_price*100 AS annual_price_usd_cents,
    max_hikes_per_month,
    photo_storage_gb,
    description AS plan_description
FROM {{ ref('raw_plans') }}
Also notice how Jinja uses ref functions to reference other models whereas SQLMesh just uses the name of the model, no ref function needed. It is able to track column-level lineage by parsing SQL, meaning you don't need to manually configure dependencies.
Incremental models
With SQLMesh, you define an INCREMENTAL_BY_TIME_RANGE model using the kind configuration, being sure to specify the time field that represents when a record is updated.
You also need to define a WHERE clause that filters the data by time. SQLMesh has macros built in that allow you to easily do this using @start_ds and @end_ds. Remember, SQLMesh puts a huge focus on doing everything using SQL.
MODEL (
  name fct_subscription_events,
  kind INCREMENTAL_BY_TIME_RANGE (
    time_column event_created_at
  )
);

SELECT
    subscription_id,
    customer_id,
    plan_id,
    event_created_at
FROM subscription_events
WHERE event_created_at BETWEEN @start_ds AND @end_ds;
Here’s what an incremental model looks like when it’s updated with new records:

Notice that it specifies the date range of records being inserted into the table.
In other tools, Jinja can be used to define incremental models. You must specify the is_incremental() macro which contains the filter looking at the MAX time from the current model.
{{ config(materialized='incremental') }}

SELECT
    subscription_id,
    customer_id,
    plan_id,
    event_created_at
FROM subscription_events

{% if is_incremental() %}

where event_created_at >= (select max(event_created_at) from {{ this }})

{% endif %}
Tests
Tests in SQLMesh are unit tests, meaning they compare the output of your code to predefined inputs. These are ran each time you make a change (and therefore run a plan), or on-demand in your CI/CD pipeline. They don’t run automatically when you run your models.
Tests are stored separately from your models in YAML files in the tests/ directory. Here, you define the model name and the input and output values.
test_example_full_model:
  model: sqlmesh_example.full_model
  inputs:
    sqlmesh_example.incremental_model:
      rows:
      - id: 1
        item_id: 1
      - id: 2
        item_id: 1
      - id: 3
        item_id: 2
  outputs:
    query:
      rows:
      - item_id: 1
        num_orders: 2
      - item_id: 2
        num_orders: 1
The cool thing about unit testing in SQLMesh is that you can also apply the tests to CTEs in your models!
SQLMesh also offers audits, which are similar to traditional integration test approaches. Audits are applied to your models after every run and prevent models from running if they fail. Think of them as safeguards!
You can create custom audits using SQL (which are stored as SQL files within the audits/ directory) or use the pre-built ones available. These are then called within the SQL files of your models alongside your config.
MODEL (
  name staging_subscriptions,
  kind VIEW,
  audits (
    not_null(columns := (subscription_id, customer_id, plan_id))
  )
);

SELECT
    subscription_id,
    customer_id,
    plan_id,
    billing_cycle AS billing_cadence,
    subscription_start_date::timestamp AS subscription_started_at,
    subscription_end_date::timestamp AS subscription_ended_at,
    status AS subscription_status,
    next_billing_date::timestamp AS next_billing_at,
    payment_method
FROM raw_subscriptions
In other tools, this same audit would look like not_null tests defined in the YAML file where staging_subscriptions is documented.
models:
  - name: staging_subscriptions
    columns:
      - name: subscription_id
        tests:
          - not_null
      - name: customer_id
        tests:
          - not_null
      - name: plan_id
        tests:
          - not_null
Getting started with SQLMesh
Let’s setup SQLMesh for Trail Trekker so we can use it to begin digging deeper into our data and modeling it out in the next part of the challenge.
Project setup
Start by creating and then activating a virtual environment. Virtual environments are used to isolate dependencies between projects in order to prevent conflicts.
python -m venv .venv

source .venv/bin/activate
Install SQLMesh.
pip install sqlmeshMake a directory for your Trail Trekker project and navigate into it.
mkdir trail-trekker

cd trail-trekker
Initialize your project. This will set up all of the scaffolding to start using SQLMesh.
sqlmesh initYou should see a message like this:
──────────────────────────────
Welcome to SQLMesh!
──────────────────────────────

What type of project do you want to set up?

    [1] DEFAULT - Create SQLMesh example project models and files
    [2] dbt     - You have an existing dbt project and want to run it with SQLMesh
    [3] EMPTY   - Create a SQLMesh configuration file and project directories only

Enter a number: 1
You can choose [1] or [3]. [1] provides you with an example project, which may be helpful for seeing how SQLMesh is organized. However, [3] is fine as well as I will be walking you through how to set up a project connected to our DuckDB instance.
Next, you’ll be asked what engine you want to use. Choose [1] for DuckDB.
Choose your SQL engine:

    [1]  DuckDB
    [2]  Snowflake
    [3]  Databricks
    [4]  BigQuery
    [5]  MotherDuck
    [6]  ClickHouse
    [7]  Redshift
    [8]  Spark
    [9]  Trino
    [10] Azure SQL
    [11] MSSQL
    [12] Postgres
    [13] GCP Postgres
    [14] MySQL
    [15] Athena
    [16] RisingWave

Enter a number: 1
Next, select [1] for the default CLI experience.
Choose your SQLMesh CLI experience:

    [1] DEFAULT - See and control every detail
    [2] FLOW    - Automatically run changes and show summary output

Enter a number: 1
Navigate to config.yml and input the DuckDB database we created as the database connection.
gateways:
  duckdb:
    connection:
      type: duckdb
      database: trail_trekker.duckdb
This is the DuckDB database that will persist throughout your SQLMesh project!
SQLMesh uses environments to separate dev from prod, while comparing the output of your local dev code to prod as the target environment. You can do this by running:
sqlmesh plan devWhen you build your first model, you will see __dev appended to the schema where you’re building your model, like in this example.
Create your first model
Now, let’s create our staging models which we will use in next week’s dimensional data modeling part of the challenge.
If you’re not familiar with the concept of a staging model, you can think of these as views that reference the underlying data table. They don’t contain any fancy transformations like joins or window functions, but instead help you set high-quality standards across all of your data sources. This is the layer where you rename fields or cast your timestamps to all be in UTC.
Creating a staging model for our features table would look like this in SQLMesh:
MODEL (
  name staging.features,
  kind VIEW,
  audits (
    not_null(columns := (feature_id))
  )
);

SELECT
    feature_id,
    feature_name,
    feature_description,
    feature_category
FROM raw.features
I defined my model name using the staging_ prefix, specified it as a view, and even applied a not_null audit on the feature_id field.
In terms of the SQL changes, I renamed some of my fields to follow proper timestamp naming conventions and casted my date fields to be timestamps.
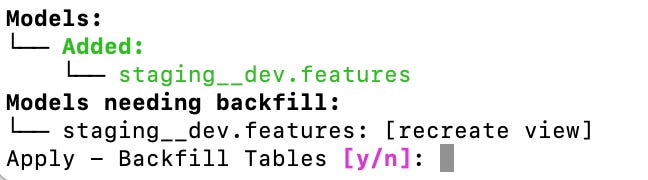
After creating this staging model, run sqlmesh plan dev (to build your model locally) and you should see something like this:

This notifies you of the detected impacts and asks if you want to backfill the effected tables (which in this case is only staging_features). A backfill in SQLMesh refers to any kind of update on a model.
After hitting “y”, you will see the physical layer update, the model batch execute, and the virtual layer updated.
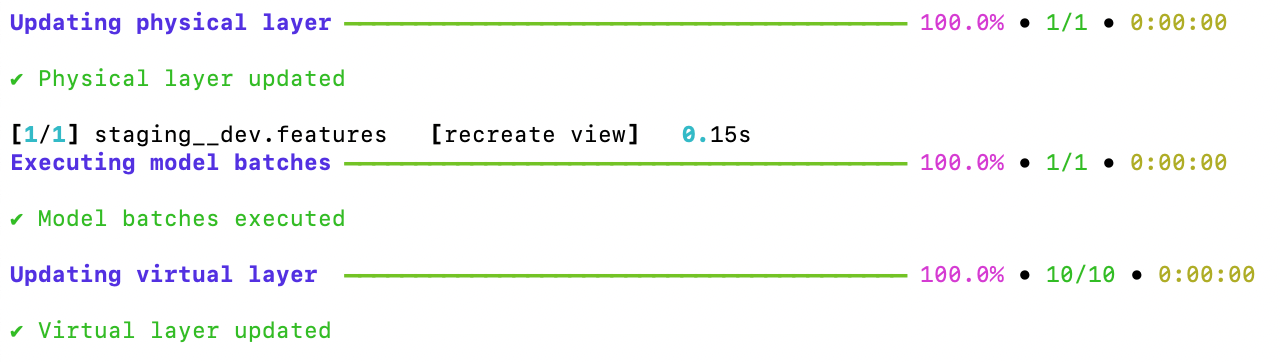
The physical layer refers to where SQLMesh stores and manages the data. You rarely interact with this.
A model batch refers to the code stored in the changed models.
The virtual layer refers to the abstraction on top of the physical layer. This is what you typically interact with.
Note: If you add the audit after you’ve first created the view, you will see something like this after running sqlmesh plan:
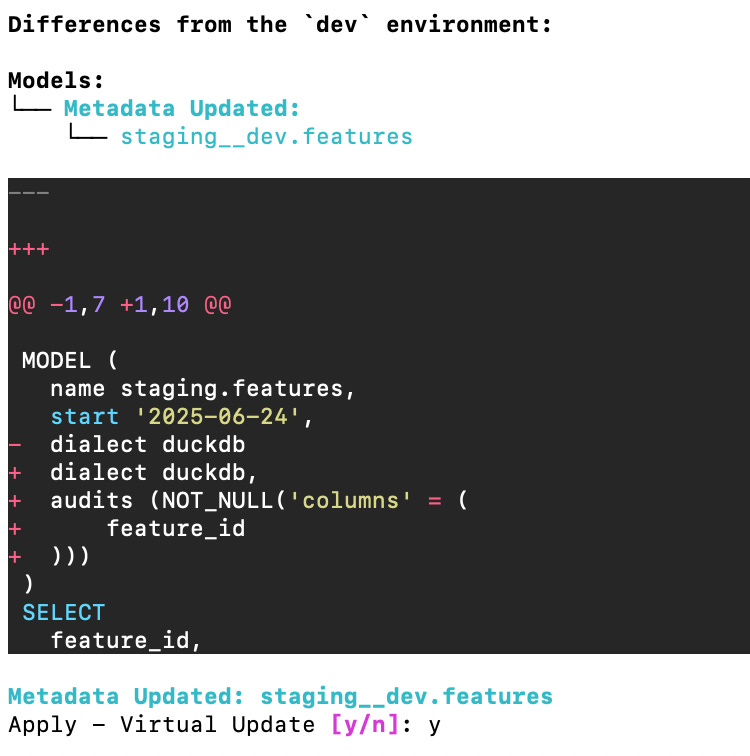
This is telling you that the transformation code hasn’t changed but the metadata has.
When you make all of your changes and see them as running successfully, your model is built and ready to be used!
You can verify that the model built as expected by running the following command:
sqlmesh fetchdf "select * from staging__dev.features"
Debugging
When I first ran my staging model, I ran into an error with the schema creation.
SQLMesh requires all model names and references to have the same level of nesting.
Error: Failed to update model schemas

Table "features" must match the schema's nesting level: 3.
If you define a schema AND table name within one model, a schema and table name needs to be defined for ALL models. It turned out that I had an external model built for features in the external/ subdirectory that was causing this error.
External models are defined in this subdirectory to help you track dependencies outside of your SQLMesh project. We won’t be using them for this project, so you can delete this file if you see it in your project.
🏆 Challenge: Set up your SQLMesh staging models
Ingest the data from the CSV files as seeds in SQLMesh. Next, create staging models for the other 3 data sources- subscriptions, plans, and customers. Add whatever tests and documentation you think are necessary. We will use these next week when we build out our dimensional data models!
As always, don’t forget to comment any questions or roadblocks you have along the way. I’m here to support you!
Tobiko also has a great Slack community where you can ask an AI assistant or their extensive community any questions.
Next week I’ll walk you through the principles of dimensional data modeling and we will model out subscription changes for Trail Trekker!
Madison